Chapter 2 • The Marrow
Espacio Publicitario (banner)
Chapter 2: The Marrow – Fast Progression & Arena Walkthrough
Overview & Progression Goals
- Zone Name: The Marrow (connecting from Bone Bottom to Deep Docks)
- Objective: Traverse the bone-calcified lower passages, complete the mandatory barricaded combat arena, activate the southern bell shortcut, and enter Deep Docks.
- Estimated Clear Time: 7 to 10 minutes.
- Key Hazards: Armored Bone Crawlers, falling stalactites, volcanic vents, and closed-arena waves.
Map & Route (Mandatory)
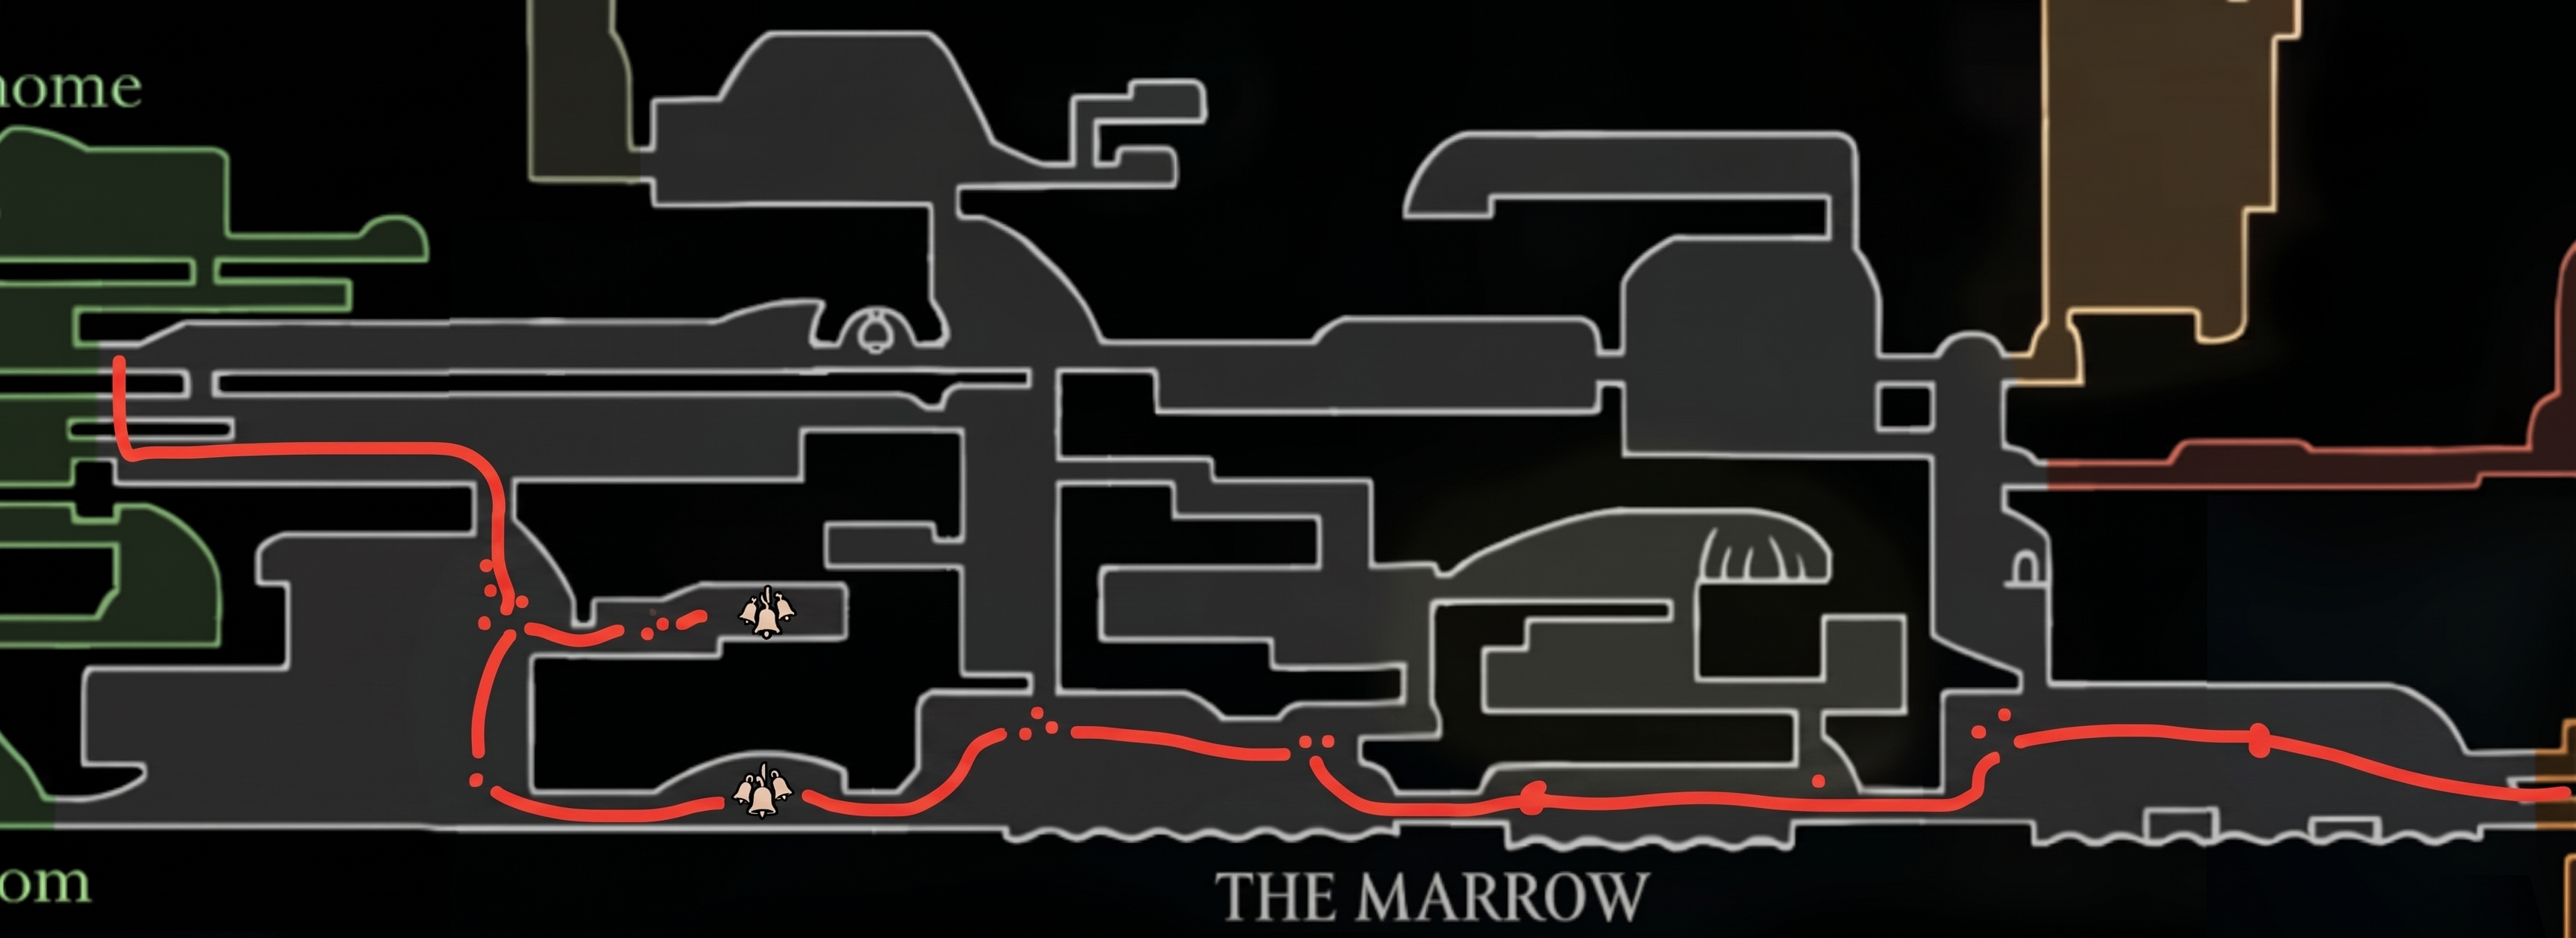 Route Summary: Traverse horizontally across the lower level following the bone dust bells.
1. Departure from Bone Bottom & Checkpoint Setup
- Town Exit: Head east through the town of Bone Bottom past the vendor huts. Do not spend rosaries on optional cosmetic trinkets at this stage.
- Bone Bottom Bell Bench: Before dropping into the canyon, sit at the settlement bell bench to lock in your spawn point.
- Threshold Drop: Drop down the eastern cliffside past the warning markers directly into the bone caves of The Marrow.
2. Navigating the Lower Bone Caverns
- The Bone Bridge Descent:
- Drop through the crumbling bone platforms into the lower horizontal passage.
- Hazard Avoidance: When encountering armored rolling bugs (Bone Crawlers), never hit them frontally while curled. Leap vertically and use Hornet’s diagonal pogo to bounce clear over their backs.
- Dust Bell Pathfinding:
- Follow the calcified hanging dust bells along the low road.
- Ignore the elevated northern tunnels; they lead to dead-end resource caches and optional vendor caves that consume extra minutes.
- Collapsing Floor Trap:
- Sprint across the cracked bone floor sections without stopping to avoid falling into lower spike pits. If you fall, wall-jump immediately off the left ridge to recover the main path.
3. Mandatory Encounter: The Bone Gate Arena
Midway through the lower corridor, the exits will seal with thick skeletal barricades, initiating a forced wave-based encounter.
Wave Breakdown & Priority Targets
| Wave | Enemy Types | Threat Level | Optimal Counter |
|---|---|---|---|
| Wave 1 | 2x Needle Wasps | Medium | Position Hornet directly beneath their flight angle. Use upward needle strikes as they commit to their sting dive. |
| Wave 2 | 1x Skull-Crusher Brute | High | Deals 2 masks on overhead smash. Bait his downward slam, sprint backward, then punish with two forward strikes. |
| Wave 3 | 1x Skull-Crusher + 2x Crawlers | Severe | Eliminate the crawling bugs first to clear the floor, then isolate the brute using aerial diagonal pogos. |
Arena Survival & Healing Windows
- Silk Bank: Do not spend thread on offensive tools during Wave 1; keep your spool filled to guarantee a 3-mask Bind heal.
- Heal Timing: When the brute begins his slow recovery animation after a three-hit ground smash combo, jump to the upper wooden ledge and trigger Bind.
4. Shrine Reward & Bell Checkpoint
- Collecting the Progression Upgrade:
- After the bone gates shatter, walk through the right-hand archway. Interact with the bone shrine altar to acquire your forward progression tool/silk offensive mechanic.
- Bellway Activation:
- Continue right into the adjacent tower shaft. Hit the hanging bell mechanism with your needle to ring the local transit bell.
- Rest at the bell bench on the lower platform to restore health and save progress.
5. Descent toward Deep Docks
- Southeastern Shaft:
- From the bell bench, drop through the narrow fissure on the lower-right side of the room.
- Wall-slide down the jagged rock shaft, watching for glowing thermal steam vents that cycle on and off every 2 seconds.
- Entering the Industrial District:
- Cut through the final bone ribcage barrier at the bottom of the pit.
- Proceed east through the heated tunnel to transition directly into Deep Docks, concluding Chapter 2.