Chapter 4 • Greymoor
Espacio Publicitario (banner)
Chapter 4: Greymoor – Rooftop Traversal & High Ascent Walkthrough
Overview & Progression Goals
- Zone Name: Greymoor (Misty Lowlands & Tower District)
- Objective: Traverse the misty plains and crumbling rooftops, bypass the high-damage swamp brutes, secure the midpoint bench at Halfway Home, and climb the eastern bell towers into The Citadel.
- Estimated Clear Time: 9 to 13 minutes.
- Key Hazards: Mud traps, heavy armored wanderers (2-mask damage), flying needle spitters, and collapsing chimney shafts.
Map & Route (Mandatory)
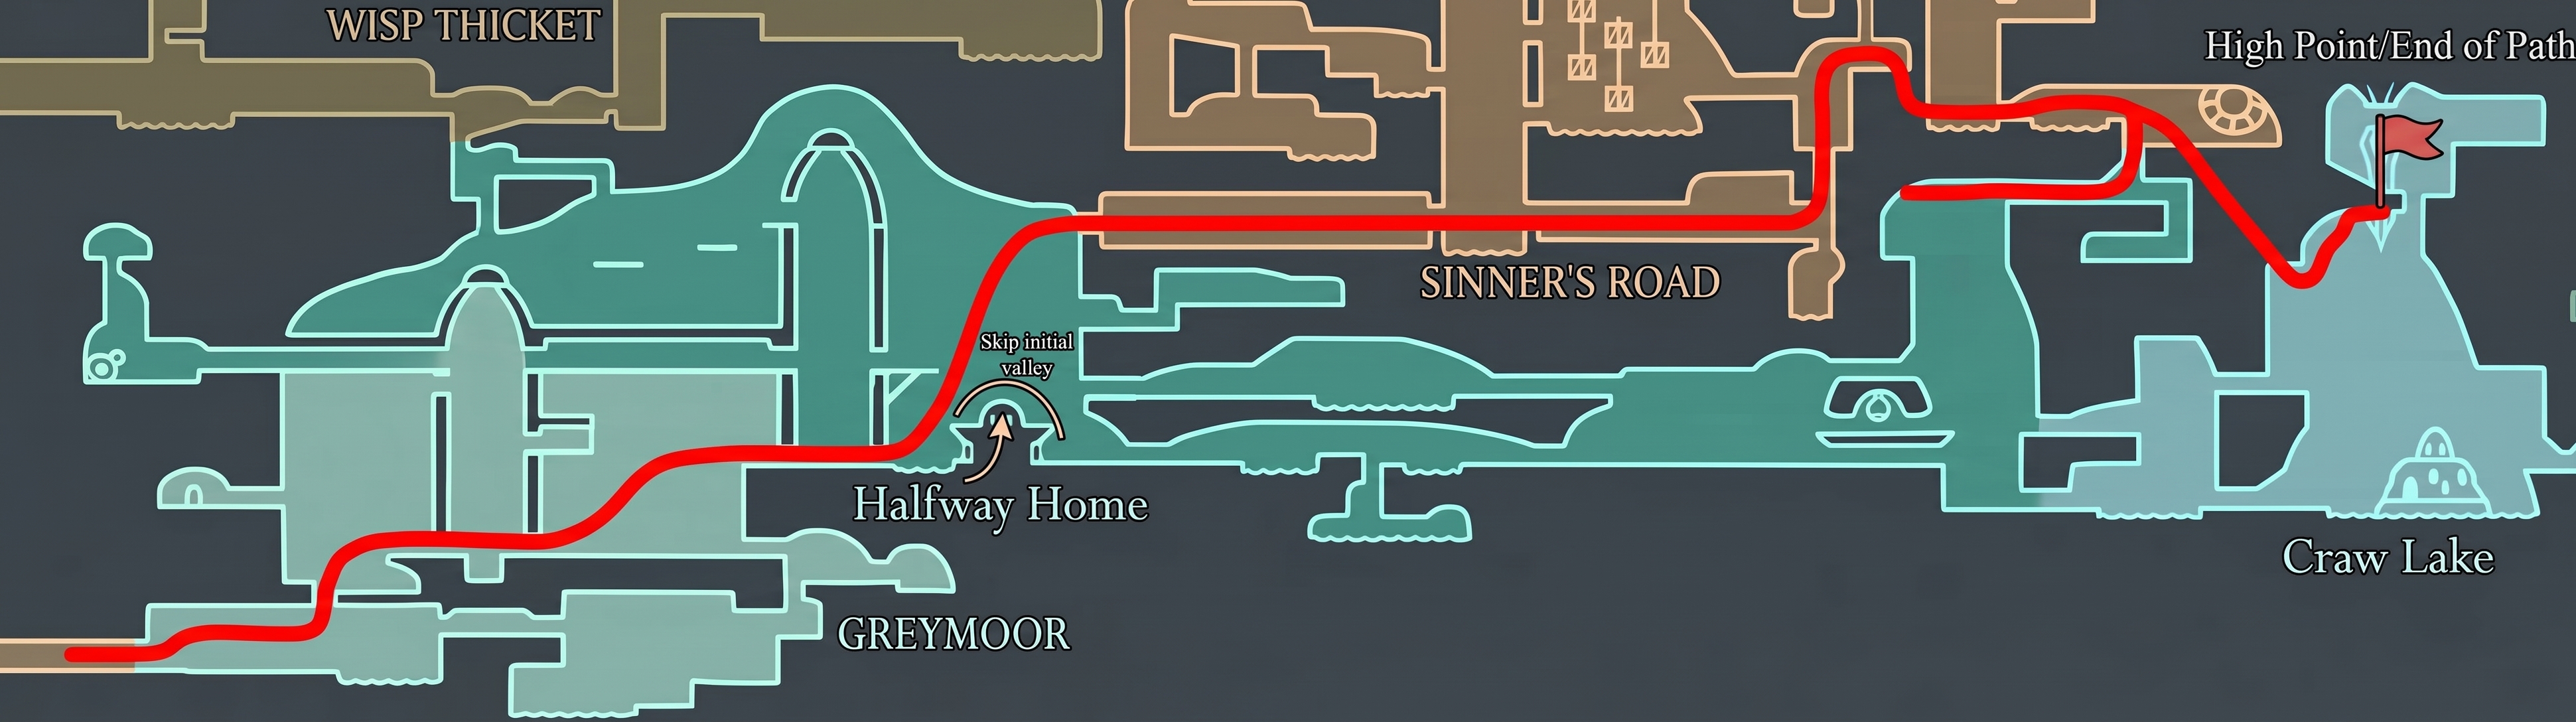 Route Summary: Skip the initial valley and keep advancing across the rooftops and high areas to the east.
1. Western Entry & Elevated Bypass
- Elevator Arrival: Step off the Deep Docks lift into the foggy lowlands of western Greymoor.
- Avoiding the Low Swamps:
- Do not drop into the muddy trenches below. The mud cuts Hornet’s movement speed in half and spawns aggressive crawling leech bugs.
- Immediately jump onto the sloped wooden roofs and brick chimneys running eastward.
- Aerial Threat Mitigation:
- Flying Mist Spitter bugs patrol the gap between the first two towers.
- Counter Strategy: Throw straight pins from a distance to eliminate them safely, or jump above their projectile arc and pogo off their wings to gain forward momentum.
2. Midpoint Rest & Shelter: Halfway Home
- Approaching the Shelter:
- After crossing the three long rooftop spans, you will reach a weathered stone manor labeled Halfway Home.
- Mandatory Bench Checkpoint:
- Enter through the main archway and sit at the central hearth bench. This saves your progress and guarantees you will not respawn at the bottom of the Deep Docks elevator if you miss a jump in the eastern towers.
- Shortcut Lever:
- Hit the wooden wall latch on the right side of the hearth to lower the exterior drawbridge, keeping a direct path open to the upper eastern road.
3. Eastern Towers & Sinner’s Ascent
- Navigating the High Route:
- Exit Halfway Home heading east and immediately scale the rain gutter pipes to stay on the high brick ledges.
- Heavy Cleaver Guards: Large horned brutes patrol the paved ground level below. Their overhead chop deals 2 full masks of damage. Completely bypass them by running along the upper parapets; fighting them is entirely optional and offers zero story progression.
- Tower Wall-Leaping:
- Scale the vertical bell tower by wall-jumping back and forth between the narrow stone walls.
- Time your wall jumps to avoid the rusted iron spike wheels protruding from the center column.
4. Ambush Encounter: The Windbreak Gate
Before accessing the citadel transit, you will hit a forced gatehouse encounter.
Encounter Waves & Optimal Counters
| Wave | Enemy Types | Threat Level | Optimal Counter Strategy |
|---|---|---|---|
| Wave 1 | 2x Crow Knights | Medium | Bait their downward thrust, step aside, and land two quick needle slashes on their recovery. |
| Wave 2 | 1x Armored Greatblade Knight | High | Keep your distance. When he lunges with his greatsword, jump over him and execute a diagonal pogo strike to his unshielded back. |
Silk Management & Healing
- Do not attempt to cast Bind on ground level during Wave 2.
- Jump onto the left wooden wall ledge, latch on using Hornet’s mantle grip, and trigger your 3-mask heal while the greatblade knight swings harmlessly below.
5. Transit Bell into The Citadel
- Activating the Grand Lift:
- Once the gatehouse gate opens, proceed east to the exterior cliff face.
- Hit the large hanging transport bell mechanism with your needle to call down the heavy carriage lift.
- Transition Threshold:
- Board the carriage platform and pull the bronze chain lever.
- Ride the elevator upward through the cloud barrier to arrive at the lower gates of The Citadel, concluding Chapter 4.